
|
|
|
|
|
|
METEOROLOGY INSTRUMENTS - The Rain Gauge
|
|

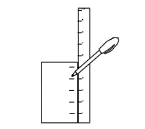
The first known records of rainfalls were kept by the Ancient Greeks about 500 B.C. This was followed 100 years later by people in India using bowls to record the rainfall. The readings from these were correlated against expected growth, and used as a basis for land taxes. In the Arthashastra, used for example in Magadha, precise standards were set as to grain production. Each of the state storehouses were equipped with a standardised rain gauge to classify land for taxation purposes. Some sources state that the Cheokugye was the worlds first gauge while other sources say that Jang Yeong Sil developed or refined an existing gauge. In 1662 AD, Christopher Wren created the first tipping-bucket rain gauge in Britain. On the left picture you can see one of the many sizes of rain gauge available during the latter part of the 19th century, the most convenient were the five inch and eight inch diameter gauges. The collecting funnel sat at the top of a cylinder set firmly in the ground, and a collecting jar and measuring cylinder completed the kit. |
||
|
Top of page
|
||
|
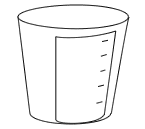
Standard rain gauge
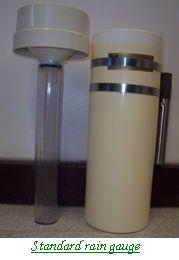
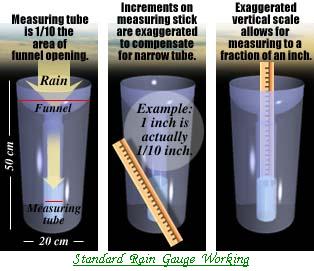
The standard rain gauge, developed around the start of the 20th century, consists of a funnel attached to a graduated cylinder that fits into a larger container.
If the water overflows from the graduated cylinder the outside container will catch it. So when it is measured the cylinder will be measured and then the excess will be put in another cylinder and measured.
The material of the gauge is important. It must be a smooth surface that is durable in all weather conditions. Ebonite was recommended, but copper was found to be much less expensive with very little change in results. About the diameter of rain gauge, different openings were carefully examined and experiments con-ducted using gauges with various sized openings all being the same height above the ground. It was found that the gauges between 4 and 24 inches were very close in readings, so the five inch gauge was most practical. It was found that the more altitude a gauge had, the less moisture was captured. Wind was the variable that caused this discrepancy. Wind had a dramatic affect on the amount of rain collected at various altitudes above the ground. The studies actually gave the basis of modern day standardization of rain gauges. The conclusions were: (1) A five inch copper gauge was most practical. (2) A standard height of the rim of the gauge should be one foot. (3) Gauges must be level; a change in slope should be avoided. (4) Sheltering influences, such as trees and buildings should be avoided for precise measurements. |
|
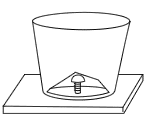
Tipping bucket rain gauge
A tipping bucket rain gauge is a meteorological device that measures the amount of precipitation, or rain, that has fallen. It is one of the most common tools used to measure rainfall. Tipping bucket rain gauges are a really interesting and fun way for you and your children to learn about the weather, and predict what the weather will be in your area. 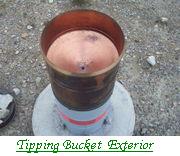
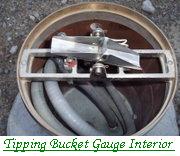
A tipping bucket rain gauge has several components that allow it to accurately measure of rainfall. As rain falls it lands in the funnel of the tipping bucket rain gauge. The rain travels down the funnel and drips into one of two very carefully calibrated ‘buckets’ balanced on a pivot (like a see-saw). The top bucket is held in place by a magnet until it has filled to the calibrated amount (usually approximately 0.001 inches of rain). When the bucket has filled to this amount, the magnet will release its hold, causing the bucket to tip. The water then empties down a drainage hole and raises the other to sit underneath the funnel. When the bucket tips, it triggers a reed switch (or sensor), sending a message to the display or weather station. Modern tipping rain gauges consist of a plastic collector balanced over a pivot. When it tips, it actuates a switch (such as a reed switch) which is then electronically recorded or transmitted to a remote collection station. The tipping bucket rain gauge is not as accurate as the standard rain gauge because the rainfall may stop before the lever has tipped. When the next period of rain begins it may take no more than one or two drops to tip the lever. This would then indicate that 0.2 mm (0.007 in) has fallen when in fact only a minute amount has. The advantage of the tipping bucket rain gauge is that the character of the rain (light, medium or heavy) may be easily obtained. Rainfall character is decided by the total amount of rain that has fallen in a set period (usually 1 hour) and by counting the number of 'clicks' in a 10 minute period the observer can decide the character of the rain. 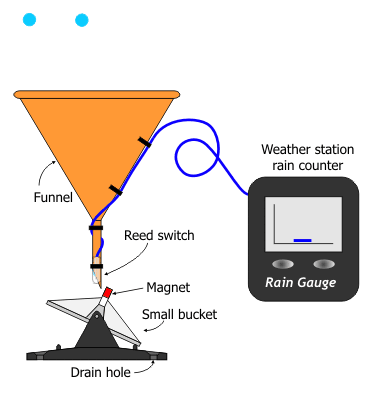
The display counts the number of times the switch is triggered. Because it knows how much rain is needed to fill the bucket, the display can calculate the rainfall. Rainfall is measured in inches; 1" of rain would fill a container with straight edges to a level of 1". Note that tipping gauges can incorporate weighing gauges for the best of both. In these, a strain gauge is fixed to the collection bucket so that the exact rainfall can be read at any moment. Each time the collector tips, the strain gauge (weight sensor) is re-zeroed to null out any drift. To get the most accurate results from a tipping bucket rain gauge, you need to properly install the rain gauge. The rain gauge must be positioned on a flat surface – if the surface isn’t flat, the see-saw may tip before the bucket has filled to the calibrated level, or not tip at all. If the bucket doesn't tip at the calibrated level, the rainfall calculated will not be correct. Use a spirit level to determine whether a surface is flat, and then fix the gauge to the flat surface to ensure you are getting an accurate reading. The rain gauge must be positioned on a surface that does not vibrate – surfaces such as a porch or fence can move and vibrate. The tipping bucket is very sensitive and any vibrations could cause the gauge to tip even if it is not raining. The instrument must not be positioned near trees – being positioned near trees could allow leaves or pollen to fall inside the funnel and block it, causing an inaccurate reading. It must not be positioned in a sheltered area – Being positioned in a sheltered location (such us beside your house or a fence) could significantly increase or decrease the amount of rain depending on the wind direction, and cause an inaccurate reading. The gauge should be positioned at least twice as far away from the object as the object’s height (e.g. if the fence is 6 feet high, the gauge should be positioned at least 12 feet away). Your weather equipment must not be located near any magnetic, steel, or iron objects – magnetic, steel, or iron objects can affect the amount of time the magnet will hold the bucket or whether it will hold it all, causing an inaccurate reading. |
|
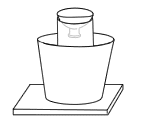
Weighing precipitation gauge
A weighing-type precipitation gauge consists of a storage bin, which is weighed to record the mass. Certain models measure the mass using a pen on a rotating drum, or by using a vibrating wire attached to a data logger. The advantages of this type of gauge to tipping buckets is that it does not underestimate intense rain, and it can measure other forms of precipitation, including rain, hail and snow. However, these gauges are more expensive and require more maintenance than tipping bucket gauges. |
|
Optical rain gauge
These have a row of collection funnels. In an enclosed space below each is a laser diode and a phototransistor detector. When enough water is collected to make a single drop, it drips from the bottom, falling into the laser beam path. The sensor is set at right angles to the laser so that enough light is scattered to be detected as a sudden flash of light. The flashes from these photodetectors are then read and transmitted or recorded. |
|
Top of page
|
|
A snow gauge is a type of instrument used by meteorologists and hydrologists to gather and measure the amount of solid precipitation (as opposed to liquid precipitation that is measured by a rain gauge) over a set period of time. 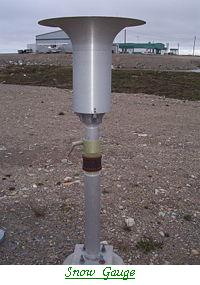
The snow gauge consists of two parts, a copper catchment container and the funnel shaped gauge itself. The actual gauge is mounted on a pipe outdoors and is approximately 1.5 m (4 ft 11 in) high, while the container is 51.5 cm (201/4 in) long. When snow has fallen the container is removed and replaced with a spare. The snow is then melted, while still in the container, and poured into a glass measuring graduate. While the depth of snow is normally measured in centimetres, the measurement of melted snow (water equivalent) is in millimetres. An estimate of the snow depth can be obtained by multiplying the water equivalent by ten. The snow gauge suffers from the same problem as that of the rain gauge when conditions are windy. If the wind is strong enough, then the snow may be blown across the wind gauge and the amount of snow fallen will be under-reported. However, due to the shape and size of the funnel this is a minor problem. If the wind is very strong and a blizzard occurs then extra snow may be blown into the gauge and the amount of snow fallen will be over-reported. In this case the observer must judge how much of the water is from snow blown into the container and how much is fallen snow. Another problem that occurs, is when both snow and rain fall before the observer has time to change the gauge. In all of these cases the observer must judge how much of the water is snow and how much is rain. Remote reading gauges, such as used by weather stations, work similarly to rain gauges. They have a large catch area (such as a drum sawn in half, top to bottom) which collects snow until a given weight is collected. When this critical weight is reached, it tips and empties the snow catch. This dumping trips a switch, sending a signal. The collection then repeats. If the catch container has a heater in it, it measures the snow weight accurately. It is also possible to tip based on volume instead of weight, with appropriate fill sensing. Another snow sensor called a snow pillow looks like a round bag laying on the ground. Inside the pillow is a liquid such as an environmentally safe antifreeze. Usually the snow pillow will be connected to a manometer. The manometer reading will vary based on how much snow is sitting on the pillow. This type of sensor works well for many locations but is more difficult to use in areas of hard blowing snow. |
|||
|
Top of page
|
|||
|
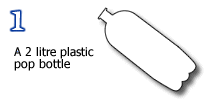
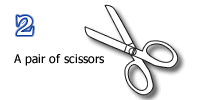
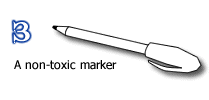
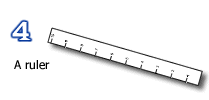
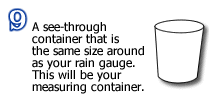
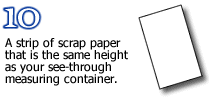
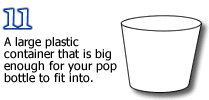
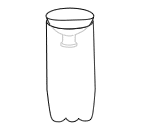
It’s very simply to make your own Rain Gauge. The only materials that you will need are:
|
|
|
|
|
|
|
|
|
|
|
|
|
|
Assembling Your Rain Gauge
|
|||

|
Step 1.
|
||
|
Step 2.
|
||
|
Step 3.
|
||
|
Step 4.
|
||
|
Step 5.
|
||
|
Step 6.
|
||
|
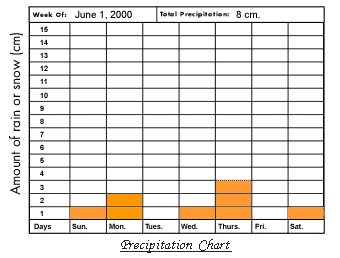
Here is an example of a precipitation chart that has been filled in.
Every time you check the temperature (at least 3 times a day), check your rain gauge too. Empty any water from your plastic container into your measuring container. Use the strip of paper attached to the container to measure how much water there is.
Draw a bar on your precipitation chart. The height of the bar will show how much water was collected. See the sample precipitation chart below to see how it should be filled in.
If you need to measure the amount of snow, take out the funnel part of your rain gauge. Let any snow collect in the bottom part. At the end of each day, dump any snow from your plastic container into your measuring container. When the snow has melted measure how much water there is. Draw a bar on your precipitation chart to show the amount.
Amount of water collected in Rain Gauge:
Draw your own precipitation chart or print out the one we made. You will need one chart for the week.
|
|||
|
Top of page
|
|||
|
Recommended screen resolution: 1024x768, color quality: 32 bit and IE 5.x or higher Never base important decisions on this weather information Not to be used for protection of life and property!! KIFISSIA meteo Copyright © 2006 - Ioannis P. Fragos , All rights reserved
|